Write-Up | LetsDefend.io Event 119: “SOC169 — Possible IDOR Attack Detected”

In this blog series, we will cover step-by-step how to investigate each of the practice security alerts on the cybersecurity training platform LetsDefend.io. The focus of this installment is Event 119, which has alerted on the detection rule “SOC169 — Possible IDOR Attack Detected.”
If you are unfamiliar with LetsDefend, I highly recommend it for all new SOC Analysts. There are dozens of lessons on defensive cybersecurity principles and even a simulated SOC environment in which you can gain real experience analyzing and remediating security alerts just like this one. The best part? You can get started here for free! (This isn’t a paid ad–I just really love this site!)
Before we dive into our investigation, let’s take a minute to review what an IDOR attack is and how we can spot one. (Feel free to skip ahead to the walk-through if you don’t need a refresher.)
What is an IDOR attack?
Web applications often assign a unique identifier, such as a user ID, to each user which acts as a key to access their private files, pages, or other resources. These identifiers are known as direct object references because they directly reference specific users or ‘objects’ within the web application’s database.
Take a look at this example:

Notice how each Hogwarts student has a unique corresponding ID?
Typically, these direct object references are not visible to users when accessing a web application. However, web apps will occasionally reveal direct object references as parameters within their URLs, like this:
https://hogwarts.com/get_student_info?id=User1❗Note: This is not a real website.
In this example, the URL parameter references “User1”, which is the ID assigned to Harry Potter, according to our ‘database’. This means that this URL would return Harry Potter’s private information.
When direct object references are exposed to users in this way, they become ‘insecure’, because they have the potential to be manipulated. An Insecure Direct Object Reference (IDOR) attack occurs when an attacker changes the value of an exposed direct object reference in a URL parameter in order to reach resources they are unauthorized to access.
If no other controls are in place to verify the identity and permissions of the user attempting access, the attacker can simply swap out one user ID for another and successfully gain access to a different user’s private information.

Let’s look at an example. How might we exploit the previous URL to return the information for a different Hogwarts student? Say…Draco Malfoy?
According to our database, the ID associated with Draco Malfoy is “User7”. Knowing this, we can simply replace “User1” with “User7” in the URL parameter…
https://hogwarts.com/get_student_info?id=User1
https://hogwarts.com/get_student_info?id=User7
… And suddenly Harry Potter has gained access to Draco Malfoy’s private information.

So how do you spot an IDOR attack?
Unlike the previous example, attackers usually don’t have a database of identifiers at their fingertips to reference when carrying out their attacks. Instead, they first identify an IDOR vulnerability in a web application and then systematically test a series of reference values in the URL parameter to gain access to as many private resources as possible.
Knowing this, there are a couple ways to spot IDOR attacks on your network:
- Consecutive requests to the same page from the same source
- Patterns in URL parameters
Once an IDOR vulnerability has been identified, attackers typically send repeated requests to the vulnerable web page in a brute force attempt to identify direct object reference values that will yield access to previously unreachable user information. They frequently use the same source IP address for each request and test reference values in succession, effectively creating a pattern in the URL parameters. The attack might look something like this:
172.168.191.4 - [14/Apr/2024:16:01:10] “GET https://hogwarts.com/get_student_info?id=User1”
172.168.191.4 - [14/Apr/2024:16:02:12] “GET https://hogwarts.com/get_student_info?id=User2”
172.168.191.4 - [14/Apr/2024:16:03:13] “GET https://hogwarts.com/get_student_info?id=User3”
172.168.191.4 - [14/Apr/2024:16:04:16] “GET https://hogwarts.com/get_student_info?id=User4”
172.168.191.4 - [14/Apr/2024:16:06:18] “GET https://hogwarts.com/get_student_info?id=User5”
172.168.191.4 - [14/Apr/2024:16:07:23] “GET https://hogwarts.com/get_student_info?id=User6”
172.168.191.4 - [14/Apr/2024:16:08:25] “GET https://hogwarts.com/get_student_info?id=User7”
Note how all requests originate from the same IP address and occur back-to-back, each with a different “?id” parameter.
One user should not be associated with this many user IDs, so this is suspicious activity that would warrant further investigation.
With this in mind, let’s take a look at Event 119 from the LetsDefend simulated SOC environment, which indicates that a possible IDOR attack has been detected on our network.
“SOC169 — Possible IDOR Attack Detected”
On February 28, 2022 at 10:48 PM, our monitoring system issued an alert for a possible IDOR attack. Let’s claim the ticket and investigate!

Step 1: Understand Why the Alert Was Triggered

According to the provided playbook, the first step in our investigation is to gain a basic understanding of the circumstances that generated the alert. To do this, we need to identify:
- the detection rule that was triggered;
- the reason it was triggered;
- the devices involved in the event; and
- the nature of the traffic between the devices
To determine this information, we can start by reviewing the event summary provided by the monitoring system when the alert fired:

From this, we can glean the following information:
Detection Rule: SOC169 — Possible IDOR Attack Detected
Alert Trigger Reason: consecutive requests to the same page
Source IP Address: 134[.]209[.]118[.]137
Destination IP Address: 172[.]16[.]17[.]15
In this case, the detection rule “SOC169” was triggered because the IP address 134[.]209[.]118[.]137 sent consecutive requests to the same web page (https://172[.]16[.]17[.]15/get_user_info/) at WebServer1005, indicating a potential IDOR attack.
Now that we have a basic understanding of the event, we are ready to progress with our investigation.
Step 2: Collect Data

Next, we need to collect more data about the traffic between the source device and the web server to which it connected. Specifically, we are asked to determine:
- Traffic direction
- IP address ownership
- IP address reputation
- Device ownership
- Device hostname
- Last user logon time
To find this information, we can begin by querying the available logs for all traffic originating from 134[.]209[.]118[.]137 on February 28, 2022:

This query returns five firewall logs, all of which cite WebServer1005 (172[.]16[.]17[.]15:443) as the destination.
By drilling down into the log for 10:48 PM (the time of alert), we can further confirm that the traffic flowed from the internet to the internal network:

To triple check that the traffic originated from an external device, we can consult our Endpoint Security system, which returns no matches for the source IP address on the internal network.

However, the Endpoint Security system does contain a host of information about the destination device, WebServer1005:

Hostname: WebServer1005
Domain: letsdefend.local
Primary User: webadmin35
Last Login: February 15, 2022, 01:43 PM
This confirms that the destination device is a web server with the hostname “WebServer1005,” which has a static IP address (172[.]16[.]17[.]15:443) owned by LetsDefend, and a primary user, “webadmin35,” who last logged on to the server on February 15, 2022.
To gather more data about the source IP address, we will need to consult third-party open-source tools like Cisco Talos and AlienVault.
A quick search for our source IP address on the Cisco Talos IP & Domain Reputation Center reveals some interesting information:

Although the hostname and domain are unavailable, we learn that the IP address has a “Poor” reputation with a Spam Level of “critical,” and that it is owned by “digital ocean inc.”. The IP address is also registered on at least one block list, according to Cisco Talos:

From this information, we can form an initial hypothesis that the network traffic originating from this IP address is, indeed, malicious, as suggested by our monitoring system.
Querying AlienVault for the source IP address provides even more context around the nature of the device:

Note the 25 related tags linking this IP address to various malicious activities. AlienVault also indicates that this IP address has been historically associated with Intrusion Detection System (IDS) telemetry, further supporting our hypothesis.
Bearing all this information in mind, it seems reasonable to conclude that this is not benign network traffic.
Time for Step 3.
Step 3: Examine HTTP Traffic

All signs seem to point to the presence of malicious activity on the network, but has a web attack occurred? To determine this, we need to take a closer look at the HTTP traffic in our previous firewall logs, paying particular attention to:
- the HTTP response size;
- the HTTP response status; and
- the POST parameters
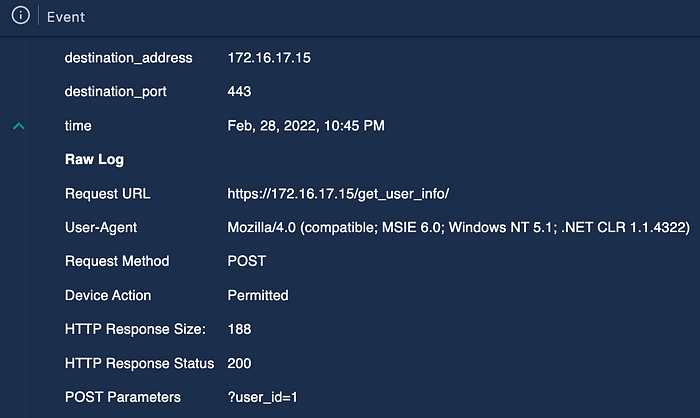

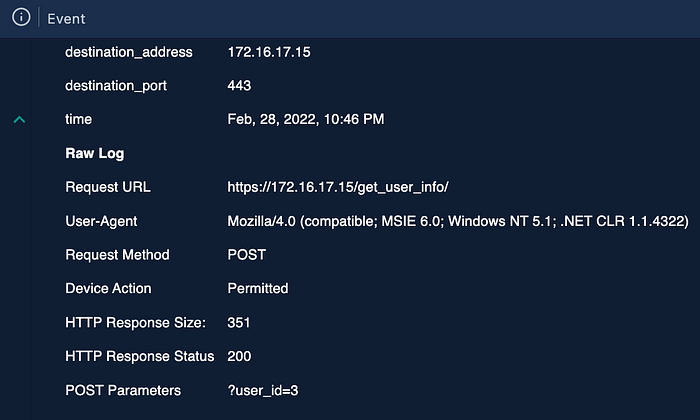
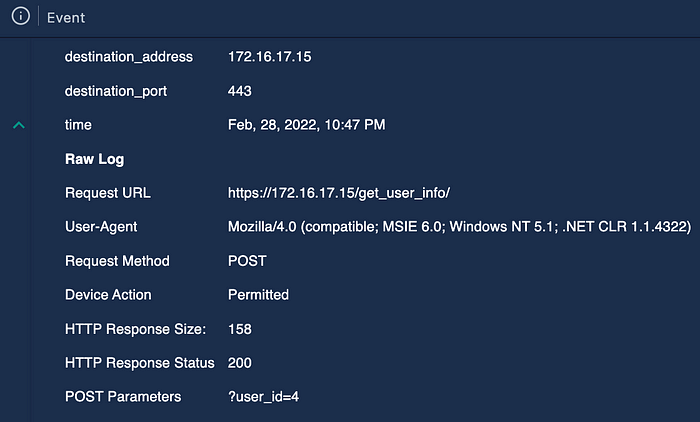
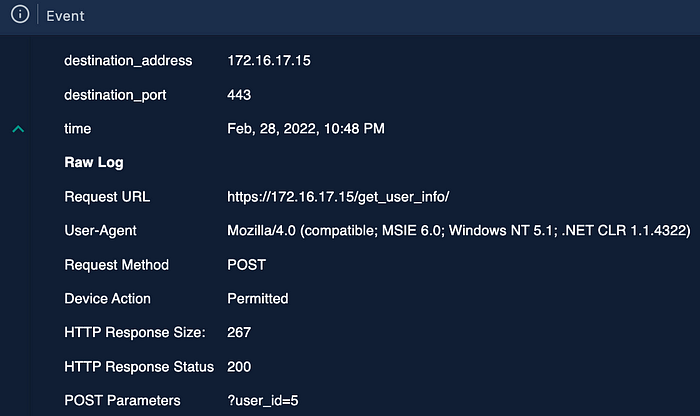
According to the firewall logs, the source IP address made five consecutive requests over three minutes to the same web page (https://172[.]16[.]17[.]15/get_user_info/), each time with a different POST parameter. Because each HTTP request received a response status of ‘200’ and had varying response sizes, we can conclude that the requests executed without error and successfully returned the desired web pages.
It looks like we have an IDOR attack on our hands!
Step 4: Is Traffic Malicious?

At this stage, we are asked to form a conclusion about the nature of the observed traffic based on the data we have collected thus far.
According to our firewall logs, one person has seemingly gained unauthorized access to five different users’ private information by manipulating URL parameters. This activity is suspicious at best, so we should classify it as “malicious.”
Step 5: What Is The Attack Type?

We now have to determine the attack vector that corresponds to the malicious traffic we have detected.
In this case, we have five consecutive HTTP requests to the same web page from one source IP address within three minutes. These requests have different POST parameters that follow a pattern of ?user_id=n+1, where n is the current parameter. This activity indicates that an insecure direct object reference vulnerability has been successfully identified and exploited, so we should select “IDOR.”
Step 6: Check If It Is A Planned Test

Before taking further action in response to the alert, we need to determine if the malicious activity is a false positive triggered by a penetration test or other planned attack simulations. To do this, we can check to see if there has been any internal correspondence regarding upcoming network tests.
A quick search in the Email Security system returns no hits for either “WebServer1005” or “172[.]16[.]17[.]15” (the destination IP address):


As there is no evidence to suggest that this malicious traffic was the result of a planned test, we should select “not planned.”
Step 7: What Is the Direction of Traffic?

Next, we need to confirm the direction of the malicious traffic. In this case, an external IP address connected to the internal device “WebServer1005,” so we will select “Internet → Company Network.”
Step 8: Check Whether The Attack Was Successful


To determine how to proceed in response to the IDOR attack, we must first confirm whether or not the attacker succeeded. A successful IDOR attack is one in which the attacker effectively reaches resources they are unauthorized to access.
A simple way to identify successful IDOR attacks is by reviewing the response size for each HTTP request. If the sizes are consistent throughout all requests, the attack presumably failed, because multiple users are unlikely to have names of identical length.
In this situation, the sizes of the HTTP requests varied from 158 to 351, indicating that this was, indeed, a successful attack, so we will select “Yes.”
Step 9: Containment

Because WebServer1005 now has a known IDOR vulnerability that has been successfully exploited, we need to contain the system for remediation and further investigation. We can achieve this by querying the Endpoint Security system for the web server and toggling on the option for “Containment” within the Endpoint Information section:

Once the host is contained, we are ready to move on to Step 10.
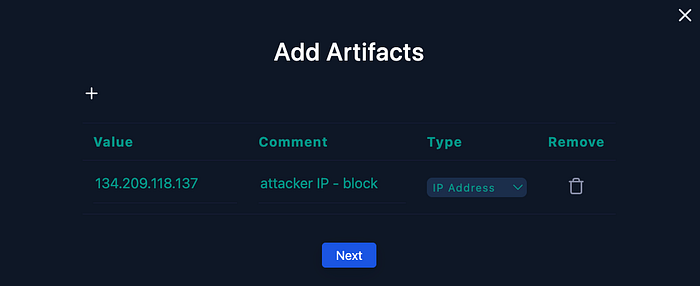
Step 10: Add Artifacts

Now that the affected host has been contained, we need to add relevant artifacts related to the attack to provide more context and direction for other analysts who may be handling this case later on.
Because we have confirmed that the source IP address is malicious, we will include that as an artifact here, along with a note indicating that it should be blocked:
Step 11: Do You Need Tier 2 Escalation?

After adding the relevant artifacts, we are prompted to decide whether or not the case needs to be escalated to Tier 2 analysts for further investigation and remediation. Because the IDOR attack was successful, this case does, indeed, require escalation, so we will select “Yes.”
On to the final step!
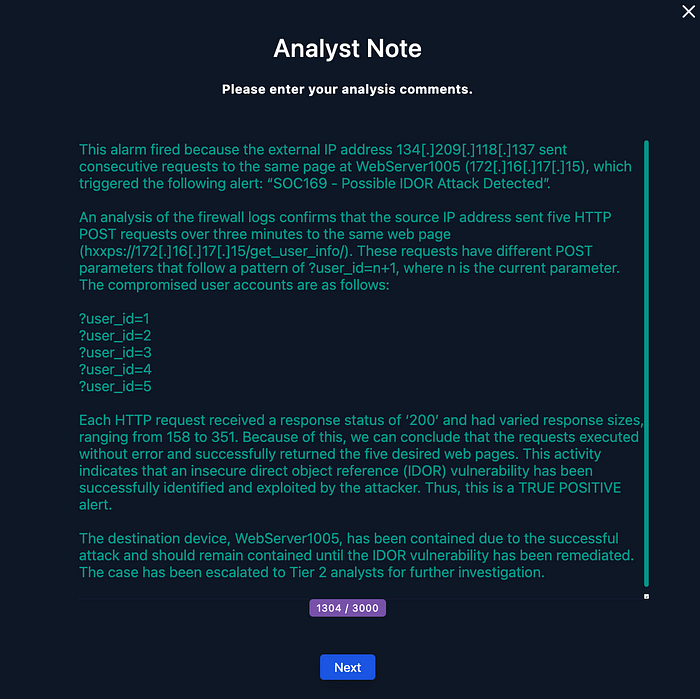
Step 12: Analyst Note

To conclude the playbook, we need to add a final note that summarizes our analysis. This is a critical last step because it documents our due diligence and provides support to the Tier 2 analysts to whom the case will be escalated for further investigation and remediation.
The Analyst Note should include:
- A brief summary of the alert that fired
- Analysis of the event with supporting evidence
- Actions taken to remediate the issue and close the ticket
- Recommended next steps, if any
Here is one example of a possible Analyst Note in response to this case:
Now all that’s left is to submit our analysis and close the playbook!

If you found value in this write-up, please consider:
👏🏻 Clapping for this article,
📩 Sharing it with others, or
💬 Commenting your thoughts below
About the Author:
Casey Hennings is a security analyst and educator who writes about cybersecurity, threat intelligence, and security awareness.
She is currently seeking an entry-level cybersecurity position where she can apply her skills and continue growing as part of a passionate, purpose-driven team of security professionals.
To connect, you can find her at @cyberwithcasey on X (Twitter) and here on LinkedIn.
